Friday, July 27, 2012

Eclipse of the Sun

Back on May 20, 2012 was celestial event not to be missed. An eclipse of the sun. It was a Sunday evening so after church and just before it was going to start we made our pinhole box to be able to see it. We went on a treasure hunt to find all the supplies and luckily we did have everything we needed. Maleah and Whitley both help cut, paste and put everything together.

Here is Whitley with her play scissors.

To make it a little more exciting I did more than one hole and made it in the shape of a heart as you can see. This is only half way through.
Maleah using the second smaller box. She would look and run so quickly it was hard to get a good picture of her.
Mom and the girls. It was so fun to try and see throughout the whole eclipse.
Ready set look and see the eclipse and the girls with there boxes.

I was so cool to experience and it was so cool to see how dark it got at the peak of the eclipse.  

Thursday, July 26, 2012

Sesame Street 2nd Birthday

It was not hard to find a theme for Whitley's party. She loves Sesame Street and loves Elmo and friends. The hard part was narrowing down ideas and not gong to over board for a 2 year old party.

I didn't get as many pictures of some of the fun details from the party and we cleaned up too quick too. So I will share what I do have and if someone really loves what I have done let me know and I can help out.

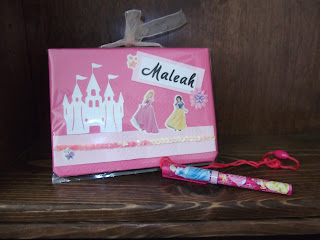
Invites made, printed and handed out was the first thing done.  The background paper was from Shery K Design (link lower on the page).  I recreated the Whitley Street sign using the Sesame Street sign as a template.  The sweet picture was taken by Jessica you can find her info here.

To Welcome all the party goers. Our friend Carey cut the vinyl for the sign while we stayed with them for the weekend before the party. Prefect for Whitley and Sesame Street party.
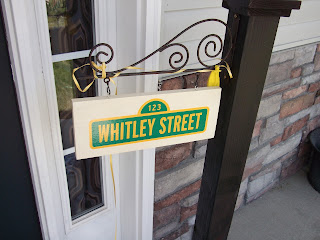
Whitley Street Sign to welcome our guests.

Next games.
Color and decorate bags with Big Bird. When everyone got there we colored pictures with the number "2" and letter "W" of course. Then they got to decorate a white lunch sack to collect candy in later. We used the Sesame Street sign with each child's name on them, and characters cut out from Sesame Street wrapping paper.

We played Trash can toss with Oscar the Grouch. It was a plastic trash bin we had and bean bags. Most just went right up to it and put it in. It was really cute to see what they did.

Next we Fished from necklaces and Fairy Wands with Zoe. It was a hit cause they each got two turns even better right.  I hung an old shower curtain in a doorway.  The fishing pole was a dowel with string and a clothes pin on the other end.

Then we got their sacks they decorated earlier and went outside for Pinata with Abby.

Pull-string Sesame Street Pinata. With the characters and "w" &"2" decorations.
Yes I made this great Pinata with a little help from some great people that shared their instructions(I looked at a lot and can't remember all of them). It was a wipe box, wrapping paper from dollar store, ribbon and treats. All the kids got two turns again. One that they all came out and the second everyone did at the same time it opened up the big flap on bottom. It was much easier than a bat but they seems to like pulling on the ribbon.


It was so hot and windy so we went back inside for Where is Elmo's Nose. For the two year old we didn't blind fold them just let them stick on Elmo's nose back on. The older kids had to close their eyes and try.

Next was a great highlight the cake and ice cream.
Whitley didn't even blow out her candles and had help from everyone else. Oh well she didn't get it.


I had a friend make the cupcakes and they were Magenta, Teal and Yellow frosting and topped with fun cupcake picks. I forgot to get a picture of all the cupcakes together. It was really cute. I got the Elmo cupcake topper design from Shery K Designs. Since Whitley loves more than Elmo I found images of the others and added them in. They turned out really cute and the kids loved to pick out their favorite character too.
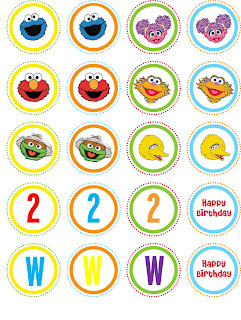
Sesame Street cupcake toppers.
This is Whitley opening a few presents on her actual birthday.

Opening presents at her party.


That was a wrap and then we sent everyone home with their goodies from the pinata and a little treat bag. I took these pictures after the party thus why there is only one left. Each favor bag had each child's name on it, Sesame Street stickers, sidewalk chalk, mini slinky, animal crackers and little Sesame street book. I forgot to add I had Goldfish crackers in the pinata to go with the theme.

I used the Sesame Street sign and made the toppers for the favor bags and pinata sacks. I had each child's name on them but only posted the Thank You one.
So thank you to all of Whitley's friends and family that were able to come and play with us. It was a great party and celebration for Whitley.

PS. I took the girls on a picnic lunch on her birthday to Von park. No playground but they still got to play and explore and have lunch at a park with no one around. They were singing and having fun after they ate lunch.


Wednesday, July 25, 2012

Disney Autograph Book After

Since I am still very new at this blog and what to add plenty of content.  All are new to here but many are ones I have done over the last year or so.  They are still very current.

Last summer our big trip was to Disneyland.  I knew my little 3 year old princess would love to see all the princesses and characters.  We were also on a very tight budget, like packing meals and limiting to only one bought toy at the very end.  I even brought dollar store glow sticks for the fireworks and World of color shows for the kids to play with.  So back to planning, I did a search for Autograph books and they were $15 plus.  I got my creative hat on and went searching my local craft stores and found a blank notebook for $1.50 and spent a couple more dollars on stickers and paper.  We got the supplies home, covered the cover and inside with scrapbook paper and decorated with things we already had.  I also used a sheet protector cut down and hot glues around the cover to protect it.

Before: Autograph Book to take

Maleah even put the Princess stickers on the pages.  Good note if you have your name and address and it is lost at Disneyland and turned in.  They will mail it back to you.  
 Then our trip to Disneyland was a great trip.  We meet and got every single princess while we were there.  A good note if you are planning the next step make sure they don't sign the front and back of the same page, you open up to the blank page for them.  Each on their own page.  Maleah just loved getting the Autographs more than the rides.

Once home we needed a way to put the photo's and autographs together so she could remember and look at them.  The notebook above had to many extra pages and Maleah just wanted to color on all the pages.  Also the pages wouldn't hold up with the weight of a photo on them.  Next step was to make her own Photo/Autograph Book.

After: Keepsake Autograph Book with Pictures
 I carefully cut out the pages from the notebook.  Printed out the pictures from each Princess and character.  Added a $1 photo album and a cute cover with scrapbook paper.  There you have it.


This Autograph book was inexpensive, nice and so very loved.  She loves looking through it and telling me every one's names and seeing herself with them.  The album has taken it's share of love and still looks good.  Hope on your next trip you might try and preserve the memories in a special way for them too.

Monday, July 23, 2012

Build a Sand Castle at Home

I started off this summer with many high hopes and a long list on a Summer To-DO list.  Well the last week of May I broke my arm and many thing had to be put on hold.  Everything is fine now but we got a slow start on checking things off.  One I knew I wanted to do was BUILD A SAND CASTLE.  Well we hadn't gone to the beach yet or one with sand to play in so I had been thinking of a way around it.  We don't live close to a beach.

I finally had a light bulb moment when my girls and many neighbor girls were bored, hot and really wanting something to do.  Make your own beach! How you say?  I took our trap laid it in the garage, added a bag of play sand, water and all the sand toys.  It was so great.  They kids loved the wet sand and being in the shade.  I even got in there and help build a couple of sand castles but they got smashed before I could grab the camera.  Oh well it was the joy of having the kids busy and playing.  It was really good learning too about packing the sand in containers and making sure it is not to wet or to dry to mold.  In the end we had 8-10 kids all playing for about an hour.

So next time you really want to have a day at the beach playing in the sand but stuck at home do what we did and make your own. 

Friday, July 20, 2012

Homemade Ice Cream


On Sunday it was National Ice Cream Day. Well we didn't have enough ice cream in the freezer but I had seen how to make your own ice cream with out the fancy ice cream machine from 2 Little Hooligans. I even had all the stuff to make it without having to go shopping, hooray!  Her directions are really great so I won't go the recipe but it was easy.

We gathered the girls and the necessary things.  We didn't have the large Ziploc baggies so we used an old canister and #10 can.  We had to have enough right, double the pleasure double the fun.

 Once we got all the cream, sugar and vanilla in the baggies.  My sweet 4 year old Miss M took my directions very well.  I had the ice and salt in the #10 can and told her to put it in the can.  Well she opened the baggie of mix and started to pour it into the can with the ice.  It was a little bit of a mess.  We just mixed up a new bag and got new ice and salt and did the directions the second time.  It is funnier looking back now at her putting it in than when we were making it.

Next we rolled and rolled.  Ours took closer to 8-10 minutes each not quite the 5 minutes.
 Gloves on in the middle of summer
 The finally treat- ICE CREAM!!
It was so fun and yet another thing off of our summer bucket list down.

Hope you try Homemade Ice Cream in a Can or Bag, either way it is good!

Princess Finger Puppets

This is a project I did in the spring but wanted to share it on my new blog since I loved it so much. Here it is:

For the Girls and our upcoming trip I have been trying to come up with activities and things for the car besides treats and movies. Last year I bought stuff for our big trip but this year I wanted to use what I might already have and craft away. Also I have to have about 2 of everything because Miss W always wants what Miss M has and back and forth. I have been loving Pinterst for a while now and have a lot of ideas pinned to go to and do. I also have a big stash of felt I bought on sale a long time ago so I could do plenty of flet projects.


The idea for Princess Finget puppets came from two great blogs Made it Monday and Serving Pink Lemonade. Once I had the pattern printed out I went for it and made double of everything of course. It was suppose to be a suprise but Miss M opened the door to the craft room when everything was out. So there went that idea. Right after she started making request for more than the 5 princesses I had patterns for. I wasn't suprised either. It only took a little figuring out to full fill her hearts desire.

The next morning the little girl I babysit came over and felt left out so she got a few and a bag of her own too.

Rapuzell, Jasmin, Tiana were ones I made up without a pattern. The pattern from Made it on Monday had Ariel, Belle, Aurora, Cinderella and Snow White.
Of course every Princess needs her Prince. I didn't really try hard to make them any one just Prince Boys.
I didn't get a picture of them alone but there is also Dora, Peter Pan and TinkerBell. I hope more than just me and my girls can tell that.
Hand modeled for you.

I loved making them and hope the girls love playing with them for a long time. I hope I don't have anymore request because I cleaned and put everything away for today.

Thursday, July 19, 2012

Alphabet Sort Busy Bag

I will do more on my new little blog than busy bags but for now I am going to get at least a few more post in about these fun activities for kids.  I think I failed to tell you briefly what Busy bags are.  They are self contained activities for children to keep Busy with. Some are fun, others educational and hopefully fun too.  I first started to make them to use on a long road trip.  They are pretty compact and some more portable than others.  There are tons out there online but I want to share a few here.

Here is the Alphabet Sort Busy Bag

 I used small plastic condiment cups with lids, craft foam and foam letters (both from the dollar store).  Cut the craft foam in the colors of the letters to fit the bottom of the small cups.  Glue the foam to the bottom of each cup.  The alphabet letters I had came in 5 colors so I made five cups with the same color foam.  Next sorted the alphabet letters to make sure I had plenty of each color and had each of the 26 letters. Put it all together and let some color and letter learning fun begin. This fits nicely into a quart size zip top baggie.  There you have it.

 Lay out the letters in order.

Group them in colors

or Start with them in the cups. 
A lot of possibles with this fun Alphabet Sort Busy Bag

These letters are small so this one is for more preschool age kids than toddlers.  I will help my toddler with this one but not alone since the pieces are small.